Hello, World!
You know those products that you see online or in the store that you absolutely LOVE and that you must have NOW?!! So you buy them. And then you get them home and think, "OK. This is awesome, but what do I do with it?" Well, these die-cut states from Studio Calico fit that description for me. I saw them at CHA and counted the days until ScrapHappy carried them. I'm a traveller. I'm a scrapbooker. You would think this would be easy, right? Sadly, it wasn't. I looked at them and pondered them for ages. I placed them on layouts (without adhesive, of course). I took them off those same layouts. I moved them around...and around...and around...and still they called to me. Until I had a serious BAM! moment, and I realized I didn't have to use them for layouts. I could use them all together as a map puzzle!
First, I had my Kid arrange them on cardstock (I still had hopes of making this a layout, but alas, they wouldn't all fit right on a 12x12 piece of cardstock). Then I decided to use a cork background and put my 'puzzle' in a frame - and you know what? It worked perfectly! After adhering the states to the cork, I added rhinestone stars to each state - bigger stars for where I've lived, and smaller stars for where I've visited. I then enclosed my puzzle background in the frame and added a title to the exterior of the glass with Thickers and Kaiser Craft letter stickers.
Showing posts with label home decor. Show all posts
Sunday, June 24, 2012
Thursday, January 5, 2012
Time for Tissue Paper
Happy New Year, Everyone! I hope you all had a very Merry Christmas and a safe New Year's. With all this extra time off from work, I hope you had a chance to play with your photos, paper, and glue!
If you need of some inspiration to jumpstart your creativity, I would like to show you a few projects I have made recently with Tim Holtz's new tissue paper rolls. These rolls come in a variety of patterns, including text and music notes, and are a heavier-weight tissue paper than you typically find to wrap presents with - almost as substantial as a light vellum. The rolls contain several yards of paper, so this is a good supply to split with your friends (hint, hint, hint).
First of all, a few layouts. On the first, Rebuilding Ground Zero, I used the tissue paper as part of my background, reminiscent of newsprint. I layered bits and pieces of Coredinations Kraft Core cardstock and scraps from my desk to complete the layout.
On this second layout, She Thinks It Is Called the Mountain of Rushmores, I used a piece torn from the roll as a mat for my title and journalling. You can see how well it layers over patterned papers to subtley mute their brightness.

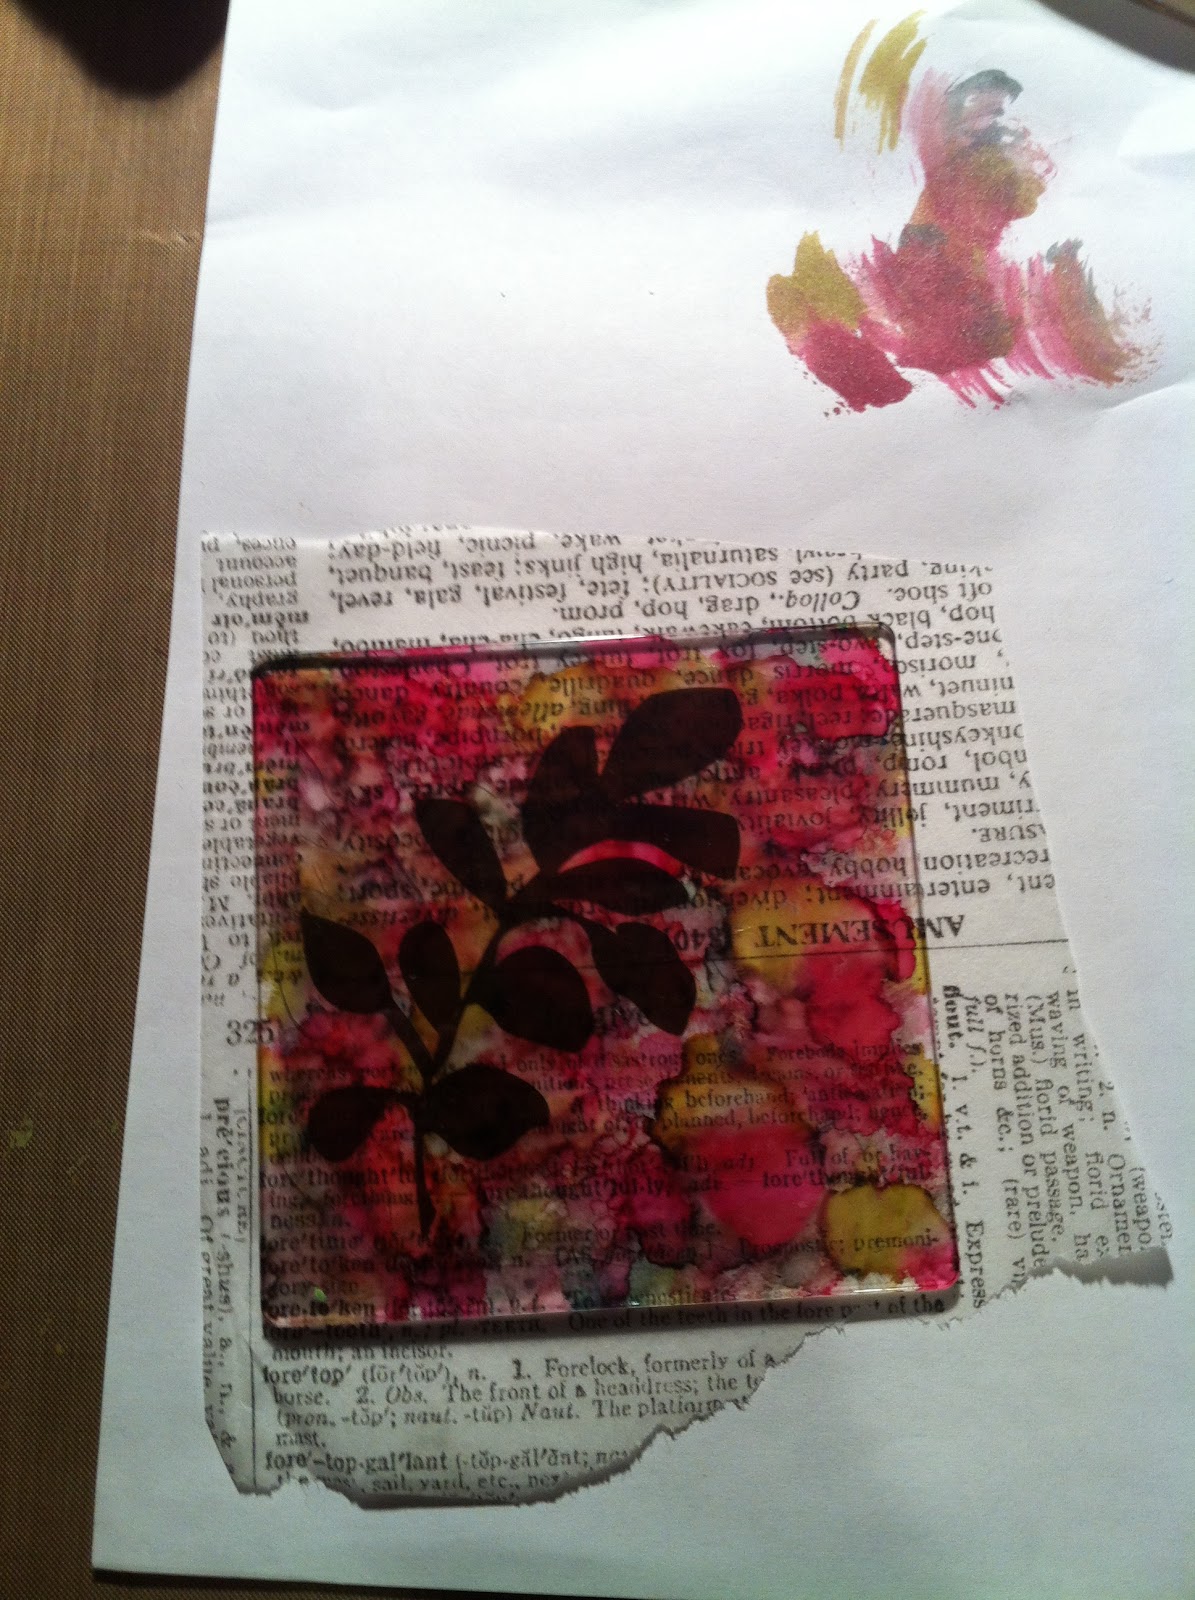
After making a few layouts, I decided I needed some messy playtime. I pulled out my alcohol inks, a square piece of acrylic (You can find several different pre-cut sizes in the store. Perfect for ornaments, mini-book covers, etc), some modpodge, my tissue paper, and some random embellishments.
First, I dabbed some alcohol ink over my acrylic block to give it some color (I used Christmas colors since I was making an ornament).
Next, I dabbed some Adirondack Alcohol Blending Solution over the block. Can you see the subtle difference between the 2 photos? In the one below, the blending solution has 'pushed' the ink around, giving it a fun splotchy look.
The alcohol ink dries quickly, so I didn't have to wait to modpodge some of the Tim Holtz tissue paper to the back of my acrylic block. I sandwiched the (very old) brown leafy embellishment between the acrylic and the tissue paper when I did my modpodging.
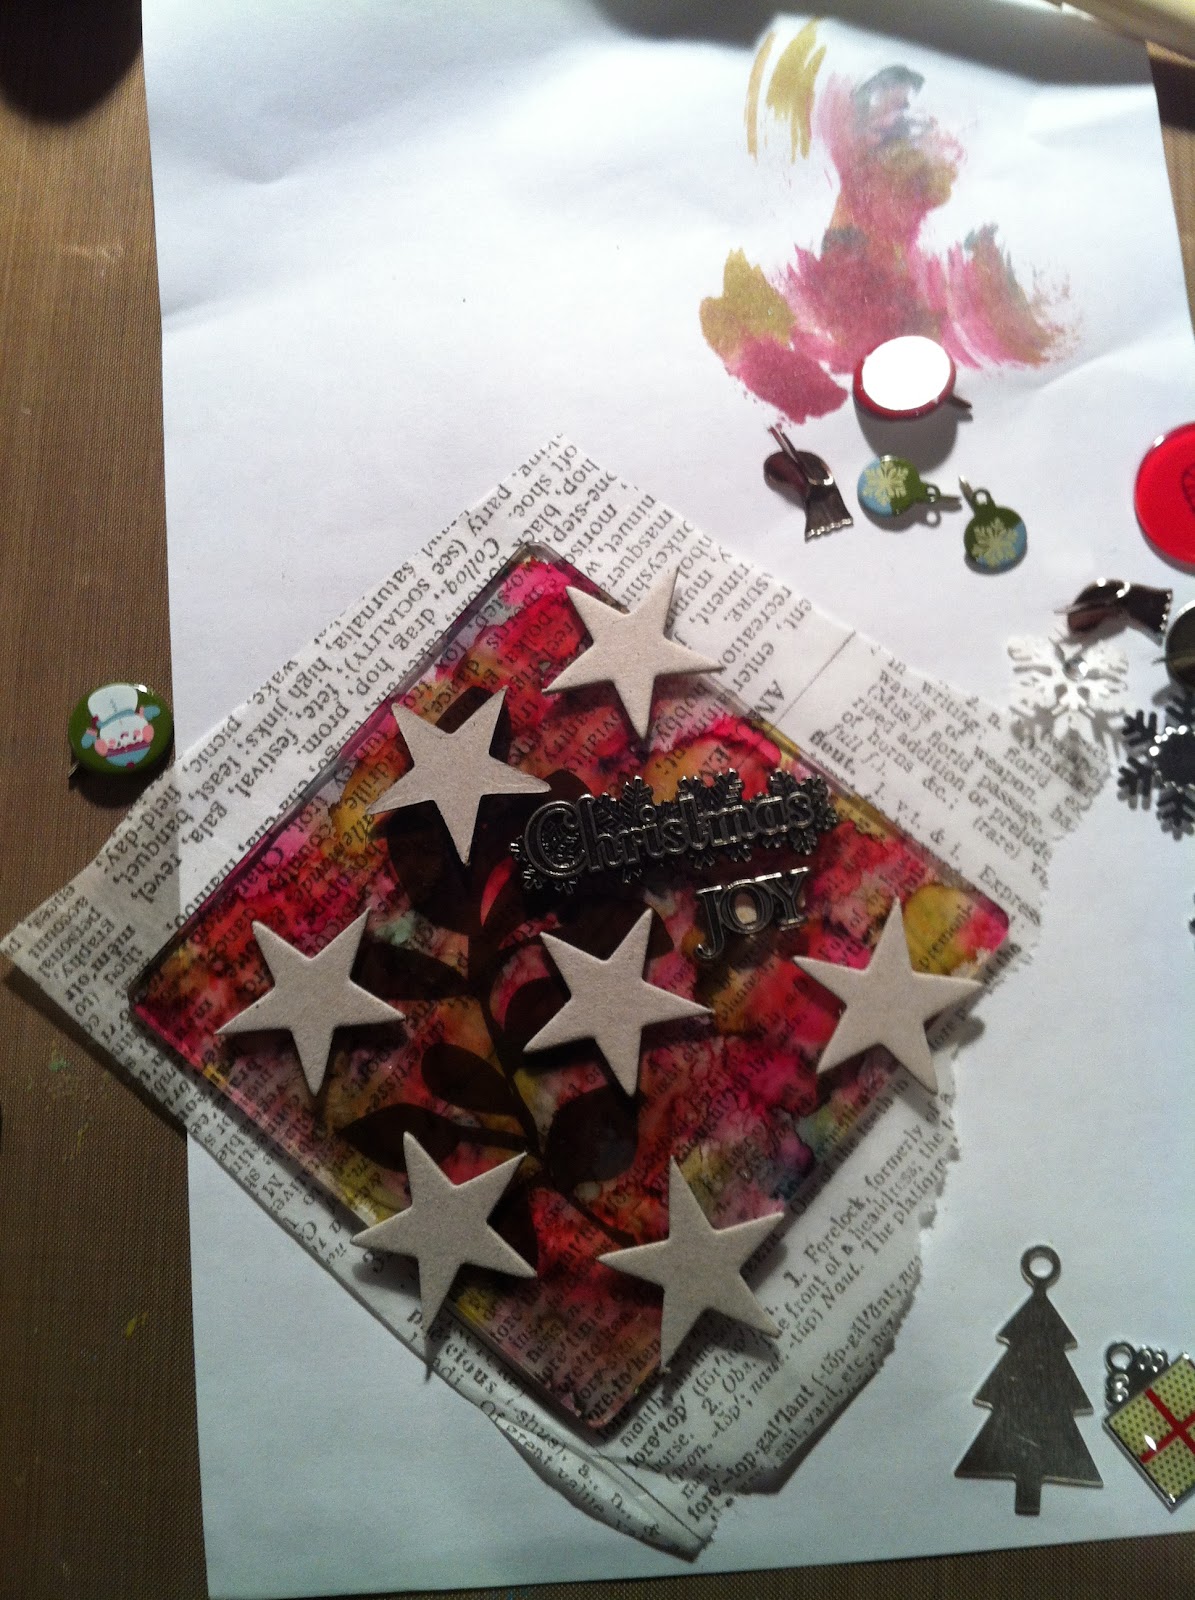
Once the modpodge glue had dried, I decorated the front of my ornament with some metal Christmas words I had in my stash, as well as some layered poinsettia flowers that I had rubbed with Stickles.
I used my Crop-o-dile to punch a hole in the top corner, tied a ribbon, and hung the ornament on our tree at ScrapHappy.
And finally, I don't know about you, but I often wrap gifts with tissue paper. I was curious to see how well the tissue paper absorbed ink, so I used my Tim Holtz Distress Stain (fired brick) to colorize some of the tissue paper. I also used the stain to coordinate the ribbon, and then I wrapped a faux-gift to put under my mini-tree next year. The tag is my first attempt at Tim Holtz's 12 Tags of Christmas. I tied it to the top to make my 'gift' look pretty :)
I hope I've given you some ideas to stimulate your creativity. Until next month, have fun making creative messes, and come see us in the store! Many of us will be heading to the Craft and Hobby Association Trade Show later this month. If there's any companies or booths you want us to check out and post peaks of, let me know!
If you need of some inspiration to jumpstart your creativity, I would like to show you a few projects I have made recently with Tim Holtz's new tissue paper rolls. These rolls come in a variety of patterns, including text and music notes, and are a heavier-weight tissue paper than you typically find to wrap presents with - almost as substantial as a light vellum. The rolls contain several yards of paper, so this is a good supply to split with your friends (hint, hint, hint).
First of all, a few layouts. On the first, Rebuilding Ground Zero, I used the tissue paper as part of my background, reminiscent of newsprint. I layered bits and pieces of Coredinations Kraft Core cardstock and scraps from my desk to complete the layout.
On this second layout, She Thinks It Is Called the Mountain of Rushmores, I used a piece torn from the roll as a mat for my title and journalling. You can see how well it layers over patterned papers to subtley mute their brightness.
After making a few layouts, I decided I needed some messy playtime. I pulled out my alcohol inks, a square piece of acrylic (You can find several different pre-cut sizes in the store. Perfect for ornaments, mini-book covers, etc), some modpodge, my tissue paper, and some random embellishments.
First, I dabbed some alcohol ink over my acrylic block to give it some color (I used Christmas colors since I was making an ornament).
Next, I dabbed some Adirondack Alcohol Blending Solution over the block. Can you see the subtle difference between the 2 photos? In the one below, the blending solution has 'pushed' the ink around, giving it a fun splotchy look.
The alcohol ink dries quickly, so I didn't have to wait to modpodge some of the Tim Holtz tissue paper to the back of my acrylic block. I sandwiched the (very old) brown leafy embellishment between the acrylic and the tissue paper when I did my modpodging.
Once the modpodge glue had dried, I decorated the front of my ornament with some metal Christmas words I had in my stash, as well as some layered poinsettia flowers that I had rubbed with Stickles.
I used my Crop-o-dile to punch a hole in the top corner, tied a ribbon, and hung the ornament on our tree at ScrapHappy.
And finally, I don't know about you, but I often wrap gifts with tissue paper. I was curious to see how well the tissue paper absorbed ink, so I used my Tim Holtz Distress Stain (fired brick) to colorize some of the tissue paper. I also used the stain to coordinate the ribbon, and then I wrapped a faux-gift to put under my mini-tree next year. The tag is my first attempt at Tim Holtz's 12 Tags of Christmas. I tied it to the top to make my 'gift' look pretty :)
I hope I've given you some ideas to stimulate your creativity. Until next month, have fun making creative messes, and come see us in the store! Many of us will be heading to the Craft and Hobby Association Trade Show later this month. If there's any companies or booths you want us to check out and post peaks of, let me know!
Thursday, December 1, 2011
A Christmas Shadow Box
Hello Crafters!
It's officially December now! Is everyone ready for Christmas? I know I am. The tree is up. The lights are on. The stockings are hung. The presents are (not) bought and (not) wrapped - which means that it's time to play, right? Today we are making a quick and easy home decor project that is great for showcasing your ever-growing collection of Christmas photos. I've actually made 2 of these so far. My mom saw the one I made for the store and asked me to make her one, too. Which brings me to the next idea - these make AMAZING Christmas presents for grandparents. Just use a 4x6 photo of their favorite grandchildren with Santa, wrap it up, and Voila! Santa pictures on Gramma's desk at work for her friends to oooh and aaah over! Perfect! (And it only takes 30-45 minutes to make! Quick, easy, and fun!)
First, gather your supplies: a 7 Gypsies shadow box ($9.95 at the store - comes in black or white!), poinsettia flowers (25 in a pack for less than $2! My kind of embellishment!), some Christmasy patterned papers (I used some from Theresa Collins, My Mind's Eye Lost and Found Christmas, and Basic Grey), black cardstock, label stickers from My Mind's Eye (I think I've used some of these on just about every project I've done the last few months - I'm in loooove), a big, pretty brad, bakers twine (5 yards for $1!), Tim Holtz Distress Stains in Forest Moss and Antique Linen, and some Distress Stickles. (You can see some 7 Gypsies tags in the photo below, but I ended up not using them.)
Now comes the 'hardest' (lol - j/k) part of this project - trimming. You need to measure the little squares on the side of the shadow box and cut 3 squares of patterned paper to size (I think they were just under 2 inches square, but I'm not positive).
Punch out the 'December 25th' element from the Theresa Collins Christmas paper. It is very white. I wanted more of a vintage look on this project, so I used my Anique Linen distress stain to color over the white. My label is now ivory! Perfect!
I also decided that I didn't want the white dots on the Theresa Collins paper to be white. I tried the Antique Linen first, but then decided I wanted it to be green. Forest Moss worked perfectly. You can see the difference between the original white, the Antique Linen, and the Forest Moss in the next picture, so you can pick whichever look you prefer.
Next, apply a thin layer of Distress Stickles to the poinsettia petals with your finger. Distress Stickles work best with a light touch. They are designed to appear like glittery, glass flecks of color on your element. If you want a thicker look, let your first layer dry, then apply an additional layer, instead of making your first layer thick. While the Stickles dry, layer your 'December 25th' punched circle onto some black cardstock (I die-cut mine into a snowflake shape for a bit of variety) and then onto a larger punched circle of patterned paper. Poke the brad through your flowers, attach it to your tag, then tie some baker's twine around it.
Now matte a few label stickers on cardstock or patterned paper. Place about 1/3-1/2 of a label on each of your patterned paper squares and adhere into your shadow box. If you want to add chipboard monograms or other decorations to your squares, be sure to do it BEFORE you adhere them into the shadow box (Trust me. It just works better this way. Learn from my mistakes :)
Glue on your 'December 25th' tag element to the edges of the shadow box using Diamond Glaze or another clear, liquid glue.
Lastly, adhere your photo into the box to complete your project.
And now I would like to remind you that ScrapHappy's 3 Year Anniversary party is coming up next weekend, on December 10. We'll have a photo booth, make-and-takes of Tim Holtz's 12 Tags of Christmas, sales, and a birthday cake. Come shop and play with us as we spend the day crafting together! I look forward to meeting you!
- Cori
It's officially December now! Is everyone ready for Christmas? I know I am. The tree is up. The lights are on. The stockings are hung. The presents are (not) bought and (not) wrapped - which means that it's time to play, right? Today we are making a quick and easy home decor project that is great for showcasing your ever-growing collection of Christmas photos. I've actually made 2 of these so far. My mom saw the one I made for the store and asked me to make her one, too. Which brings me to the next idea - these make AMAZING Christmas presents for grandparents. Just use a 4x6 photo of their favorite grandchildren with Santa, wrap it up, and Voila! Santa pictures on Gramma's desk at work for her friends to oooh and aaah over! Perfect! (And it only takes 30-45 minutes to make! Quick, easy, and fun!)
First, gather your supplies: a 7 Gypsies shadow box ($9.95 at the store - comes in black or white!), poinsettia flowers (25 in a pack for less than $2! My kind of embellishment!), some Christmasy patterned papers (I used some from Theresa Collins, My Mind's Eye Lost and Found Christmas, and Basic Grey), black cardstock, label stickers from My Mind's Eye (I think I've used some of these on just about every project I've done the last few months - I'm in loooove), a big, pretty brad, bakers twine (5 yards for $1!), Tim Holtz Distress Stains in Forest Moss and Antique Linen, and some Distress Stickles. (You can see some 7 Gypsies tags in the photo below, but I ended up not using them.)
Now comes the 'hardest' (lol - j/k) part of this project - trimming. You need to measure the little squares on the side of the shadow box and cut 3 squares of patterned paper to size (I think they were just under 2 inches square, but I'm not positive).
Punch out the 'December 25th' element from the Theresa Collins Christmas paper. It is very white. I wanted more of a vintage look on this project, so I used my Anique Linen distress stain to color over the white. My label is now ivory! Perfect!
I also decided that I didn't want the white dots on the Theresa Collins paper to be white. I tried the Antique Linen first, but then decided I wanted it to be green. Forest Moss worked perfectly. You can see the difference between the original white, the Antique Linen, and the Forest Moss in the next picture, so you can pick whichever look you prefer.
Next, apply a thin layer of Distress Stickles to the poinsettia petals with your finger. Distress Stickles work best with a light touch. They are designed to appear like glittery, glass flecks of color on your element. If you want a thicker look, let your first layer dry, then apply an additional layer, instead of making your first layer thick. While the Stickles dry, layer your 'December 25th' punched circle onto some black cardstock (I die-cut mine into a snowflake shape for a bit of variety) and then onto a larger punched circle of patterned paper. Poke the brad through your flowers, attach it to your tag, then tie some baker's twine around it.
Now matte a few label stickers on cardstock or patterned paper. Place about 1/3-1/2 of a label on each of your patterned paper squares and adhere into your shadow box. If you want to add chipboard monograms or other decorations to your squares, be sure to do it BEFORE you adhere them into the shadow box (Trust me. It just works better this way. Learn from my mistakes :)
Glue on your 'December 25th' tag element to the edges of the shadow box using Diamond Glaze or another clear, liquid glue.
Lastly, adhere your photo into the box to complete your project.
And now I would like to remind you that ScrapHappy's 3 Year Anniversary party is coming up next weekend, on December 10. We'll have a photo booth, make-and-takes of Tim Holtz's 12 Tags of Christmas, sales, and a birthday cake. Come shop and play with us as we spend the day crafting together! I look forward to meeting you!
- Cori
Subscribe to:
Posts (Atom)